You’ve locked down sharing and put permission controls in place. But files have a habit of ending up where they shouldn’t. Whether it’s a miss click, a forward-all moment, or someone dragging and dropping a sensitive document into the wrong folder, you need a layer of protection that sticks with the content. That’s exactly what sensitivity labels are for.
These labels don’t just govern access. They travel with the document, control who can open or edit it, and even dictate how it can be shared. Copilot fully respects these labels, which means if the label says “Highly Confidential /Specific People” and it’s scoped to a M365 group with finance employees, Copilot won’t deliver that content to someone outside of Finance. In this chapter, we’ll explore how to plan, deploy, and refine your labeling strategy using Microsoft’s Secure by Default framework as the foundation. Phase 1 and phase 2 are, in my opinion, the most important phases to have implemented with Copilot use.
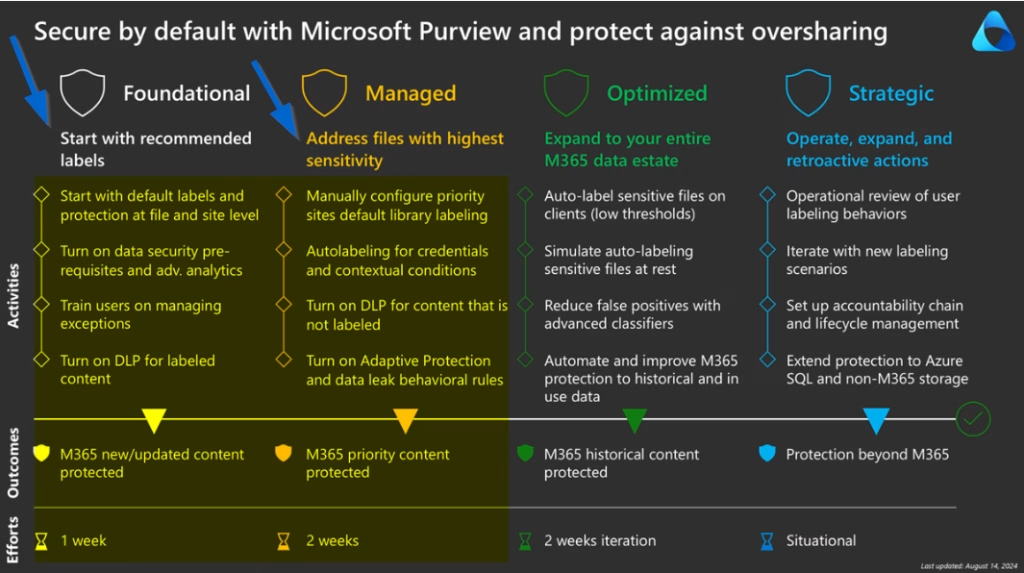
Start with a Classification Strategy. Secure by Default, Phase 1 Foundational
Begin by creating a simple, structured set of labels that reflects how your organisation handles information. Under the Secure by Default Phase 1 approach, the goal is to apply consistent labeling to all newly created documents and emails.
Here’s a solid baseline taxonomy:
- Public: Intended for external or unrestricted sharing
- General: Non-sensitive internal content
- Confidential: Sensitive data requiring limited distribution
- Highly Confidential: Critical data restricted to only specific users

To make these labels meaningful and flexible in real-world scenarios, define sublabels under Confidential and Highly Confidential:
- All Employees: Content is accessible by anyone inside the organisation including guests
- Specific People: Access is restricted to named individuals or groups
- Internal Exception: Accessible internally, but blocked from external sharing. Ideal for cases where encryption causes issues with collaboration or tooling

Apply a default label like Confidential \ All Employees to all new content. This small step ensures new data is protected right out of the gate without relying on users to take manual action.
Move to Managed Protection. Secure by Default, Phase 2 Managed
Once foundational labeling is in place, shift your focus to existing data, especially the sensitive stuff that’s already sitting in your environment. This is where Secure by Default Phase 2 comes in.
- Prioritise high-risk locations: Use Microsoft Purview’s Content Explorer or Graph API to identify SharePoint sites and OneDrives that contain sensitive or regulated content
- Apply container labels: Use SharePoint site and Microsoft Teams labels to enforce policies like restricting guest access or requiring limited download.

- Roll out auto-labeling policies: Detect and classify sensitive data automatically using built-in sensitive info types or keyword patterns if you have E5 licenses
- Back it up with DLP: Use Data Loss Prevention policies to enforce your rules. For example, block sharing of files labeled Highly Confidential \ Specific People with anyone outside that list
With these in place, you’re moving from optional protection to enforced, consistent control over your most valuable content.
Label Creation in Microsoft Purview
Create your labels in the Microsoft Purview compliance portal. For each one:

- Use clear, intuitive names like “Public”
- Add helpful descriptions and tooltips so users understand when to apply them
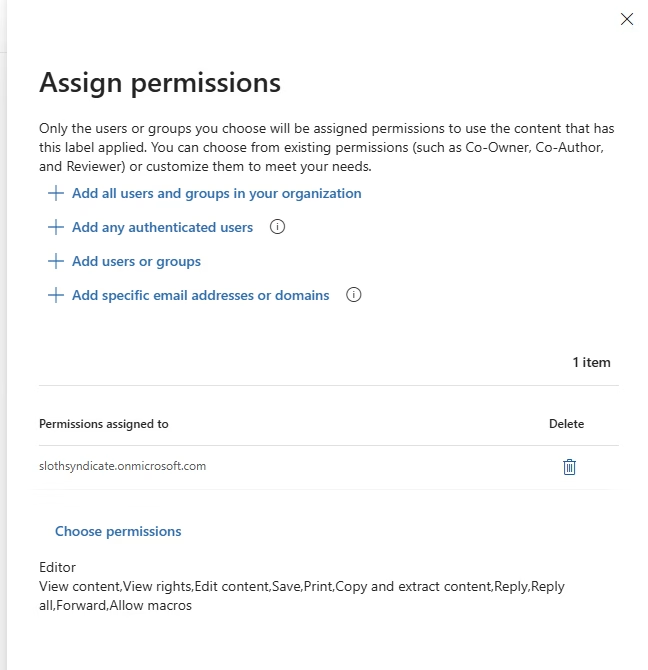
- Decide on protection settings like visual markings, encryption, access restrictions
- Publish labels to the appropriate user groups or departments
Start by using a default label like General and train your users to label their files accordingly. Over time, use your E5 license or think about switching to E5 (addon) to layer in automation to handle the repetitive and high-risk scenarios.
User Training and Adoption Tips
Labels should support your users, not frustrate them. Keep things intuitive.
- Default to Internal or Confidential \ All Employees to cover most use cases
- Show examples of how labels behave, especially what encryption does
- Train users to spot when to switch from “All Employees” to “Specific People,” especially when handling personal data, contracts, or financials
- Introduce Internal Exception as the label to use when encryption disrupts normal work, but external sharing still needs to be blocked
If you make labeling mandatory, explain why. Framing it as protecting their work, not just ticking a compliance box, helps with buy-in.
How Copilot Interacts with Sensitivity Labels
Copilot honours all sensitivity labels and their access restrictions. If a document is encrypted for a specific group, Copilot can only pull from it if the user asking the question is included in that policy. This turns labels into a safety net that catches any gaps in your permissions model.
Even better, Copilot outputs will inherit the label of the most restricted source it pulls from. If it summarises a Highly Confidential \ Specific People document, the response will carry that same label. That’s not just smart. It’s secure by design.
Check What’s Working and Tune the Rest
Use the Activity Explorer and Content Explorer in Microsoft Purview to monitor adoption. If one label is overused or others are ignored, check your naming, tooltips, and training. It’s often a messaging issue, not a user problem.
Over time, introduce automatic labeling for documents containing personal data, financial identifiers, or internal codes. You don’t need to get it all right on day one. Just move forward incrementally and adjust based on what you learn.
What You’ll Be Glad You Did
Sensitivity labels are more than just metadata. They’re your organisation’s voice of reason when things go sideways. They control access, prevent leaks, and give you insight in your files. When you build your classification strategy on the Secure by Default framework and use practical sublabels that reflect how people actually work, you set yourself up for both control and flexibility.
Up next, we’ll cover how to keep sensitive data from leaving the environment entirely. Time to let Data Loss Prevention do some of the heavy lifting.